Building this Blog
Is it a meme that every tech person's blog gets a 'how it was built' introduction? Well, I don't really care. I haven't gotten sick of them, yet. There were some pretty interesting one's I've read. I hope this one is like them :)
The looks
First of all, I want to say that recently (about a year ago) I've gotten very interested in designing user interfaces. Why do this? Well, when you're using design tools like Figma, Sketch, Adobe XD, Photoshop, etc. you can iterate very quickly. I personally work with Figma.
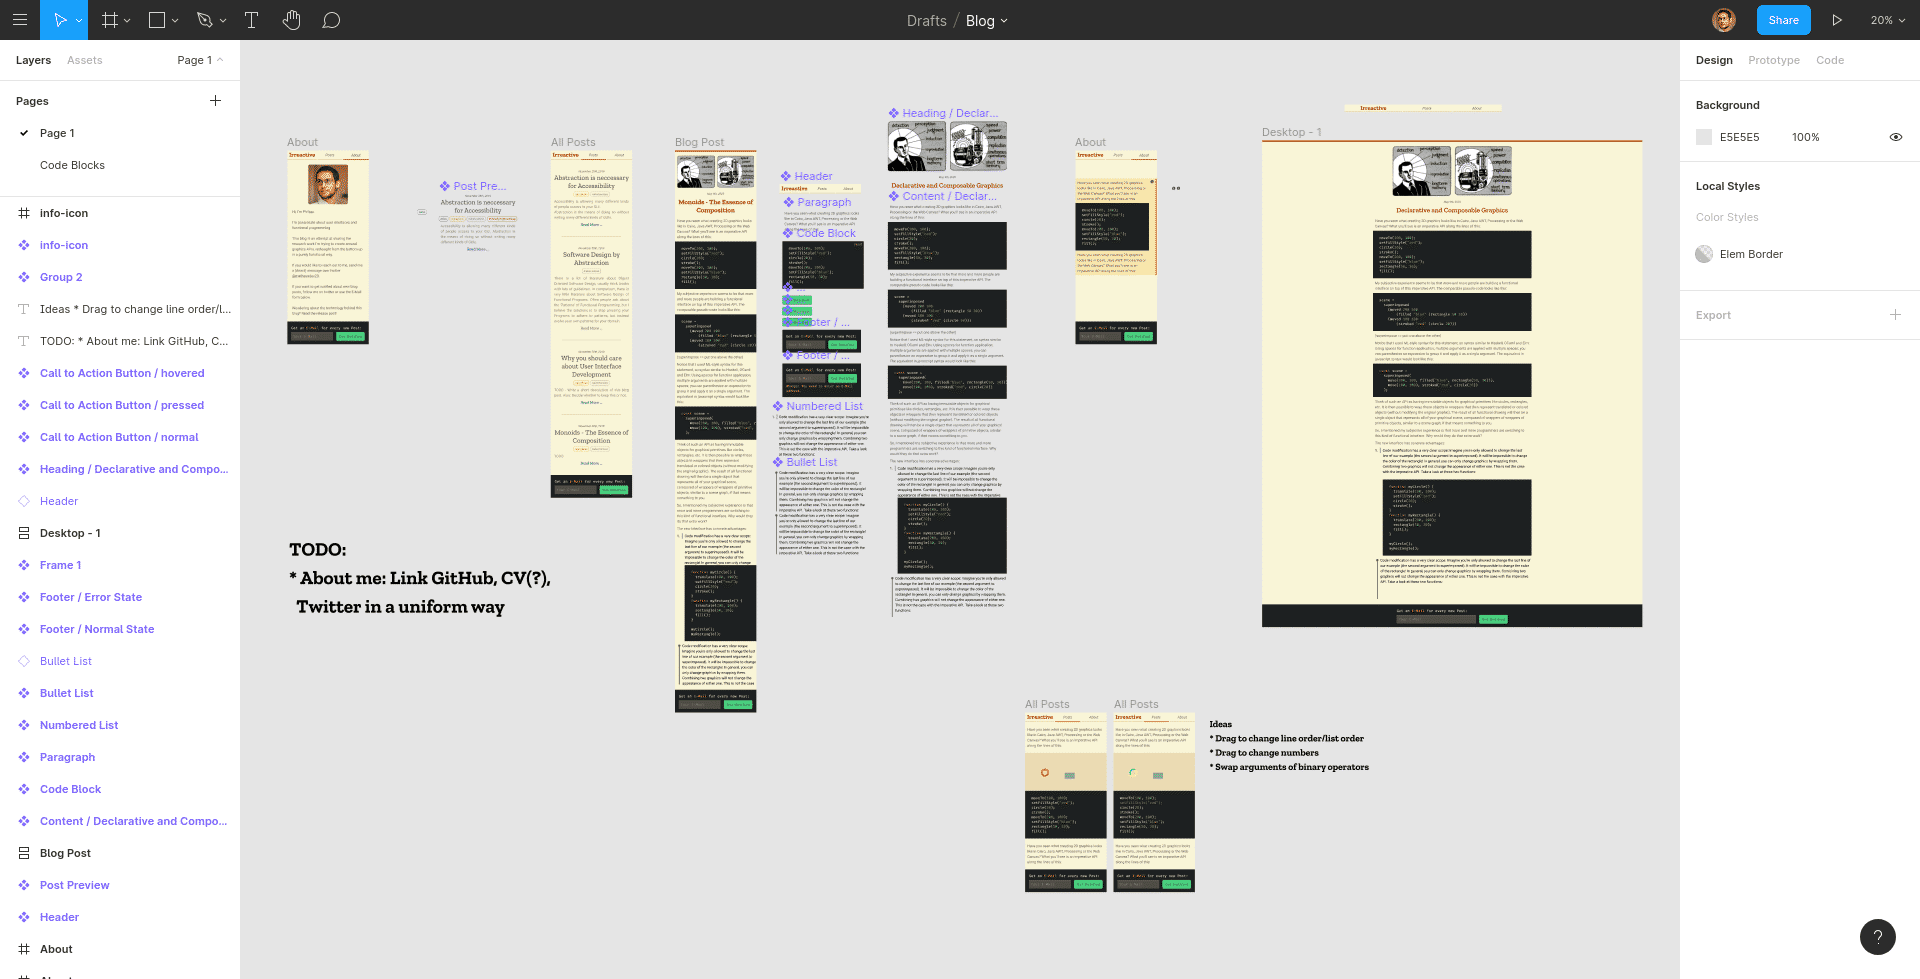
Click to enlarge. A screenshot of this blog's figma file (it's kind of messy). Look at a read-only version.
Designing stuff before building it is extremely important. Let me go through my reasoning:
- You want to have something aesthetically pleasing.
- For that you need lots of iterations. Your first attempt will look bad. You won't choose the right spacing, the right layout, the right colors, the right font size, the right font, etc.
- You can't change the colors, fonts, spacing and especially layout quickly in code. Code is way more abstract: You don't implement 1 layout, you implement infinitely many: Not one layout at 1280px screen width, but a layout that works across many screen sizes at once. That's way more difficult and takes scaffolding and therefore time.
Naturally, my eyes were opened as soon as I started incorporating an explicit designing step before writing code. Actually, I was also designing previously. You're always designing when you're making something visual, but it used to be intertwined with finding a good architecture in your code, all while being slow.
I also thought quite a bit about the visual identity this site should have. At the time I got bored by this 'clean' kind of look that many websites have.
A look dominated by
- Cool colors: Blue, cyan, teal
- Soft shadows
- Lots of literal white space
So I wanted to create something refreshing. A little more playful and easy on your eyes. To be honest, after working countless hours designing, coding and writing this blog, I can't stand looking at it anymore.
But the first time I got somewhere with it, I liked it.
Distraction Time!
If you want to see something completely refreshing, take a look at Mackenzie Child's blog design template. (His blog also looks pretty cool.)
Back to this post.
This blog's color palette is based (almost exclusively) on gruvbox, which is a popular syntax highlighting theme.
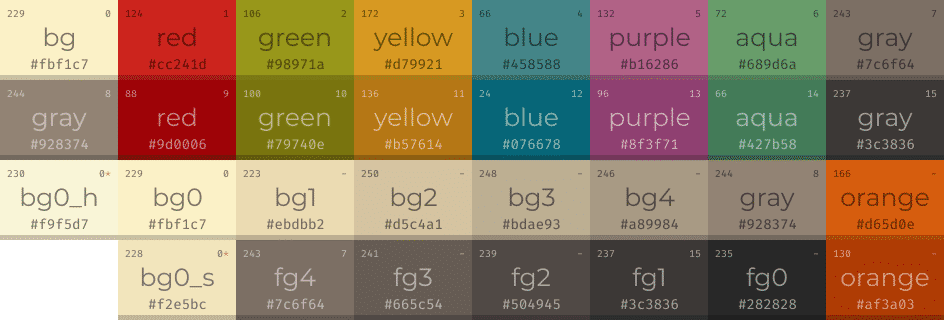
The 'gruvbox' color palette used for this blog. I've created a figma community file, so you can use it in your figma designs, if you want to!
With that, I strive to have something playful - you might only be used to these colors from your code editor - and something that is easy on your eyes.
The works
As a functional programming language enthousiast, I have reached for generally uncommon tools. However, I've been very pleasently surprised by how smoothly my choices worked out for this project!
This site was built in elm. It's the language I enjoy writing code in most. An essential piece of the puzzle is elm-pages by Dillon Kearns: It allows my website to be rendered on the server side into neat html pages, which are 'hydrated' once the browser loaded all code.
I'm writing the individual blog posts as markdown files. I'm using (also Dillon Kearn's) elm-markdown for parsing these files. It also allows for quite some customization of your markdown via html elements. The above palette picture with it's subscript was written like this:
<ImgCaptioned
  id="gruvbox-theme"
  title="A Figma Community File for ease of use of Gruvbox"
  alt="A Figma Community File for ease of use of Gruvbox"
  src="images/building-this-blog/gruvbox-palette.png"
>
The 'gruvbox' color palette used for this blog. I've
created a [figma community file]
(https://www.figma.com/community/file/840895380520234275),
so you can use it in your figma designs, if you want to!
</ImgCaptioned>
This ImgCaptioned is then interpreted by my elm code:
imgCaptioned :
    Markdown.Html.Renderer
        (List (Html msg) -> Html msg)
imgCaptioned =
    Markdown.Html.tag "imgcaptioned"
        (\src alt maybeWidth idAttrs children ->
          Html.figure ... -- Code that produces Html
        )
        |> Markdown.Html.withAttribute "src"
        |> Markdown.Html.withAttribute "alt"
        |> Markdown.Html.withOptionalAttribute "width"
        |> withOptionalIdAttribute
I even have the children as rendered markdown available, so I can use markdown inside the html elements again (notice the markdown link syntax for the figma file inside the element's body).
I've made extensive use of the ability to create custom elements for my markdown. The interactive elements on my blog posts are all implemented in elm.
Tailwind CSS
This choice might be more popular: I've been following the creators of Tailwind CSS, Adam Wathan and Steve Schoger, since I've read Refactoring UI last year. That book was so helpful for me, as a programmer and a wanna-be-more-like-a-designer. I don't actually know why I'd recommend it for programmers, who've been doing 'programmer art' so far, because I don't think there's any prior programming knowledge needed to read the book. Still, that's what I think the book's main audience is.
Anyway, that book was so great I checked out other stuff they made. And I've been struggling with how to do CSS 'right' a lot: In the previous version of this blog I tried to do everything with 'Semantic CSS', but that just sucks. Adam Wathan perfectly explains why that sucks in his article.
Netlify
That's my hosting provider. It's become pretty known I feel, but that makes sense, it deserved its fame. Netlify basically lets me deploy static pages from a git repository.
So what's the advantage over GitHub/GitLab Pages? It just seems easier. All I do is
- Give Netlify read-access to my repository
- Give it the npm script command for generating all my pages
- Give it the destination of my generated static content
And it figures out the rest, all while having a beautiful user interface.
Since implementing the E-Mail form at the bottom I've also made use of Netlify's 'Forms' and 'Functions' features.
- Forms tracks all submissions to the email form below.
- Functions runs a 'serverless function' every time an event is triggered. In this case it's form submissions. In the end it runs on AWS servers, as far as I know, but I don't have to do anything with AWS. Netlify handles that for me.
Both these 'addons' are free for limited usage and it might be just enough. It's great.
And finally another incredibly useful tool: Netlify dev, a command-line utility to basically run what netlify 'would run on servers' on your working machine: You start it up, it serves the files from localhost and runs configured Netlify Functions on your machine instead of on AWS. No need to 'commit and push this work-in-progress just to test' anymore.
I've now even changed the way my domain is set up, so basically this is now 90% hosted on Netlify with 10% (the code) hosted on GitHub.
Ok, I feel I've praised Netlify enough by now (I swear I'm not affiliated).
Buttondown
Speaking of email submissions, I'm running my newsletter using Buttondown. To be honest, the main reason I did was this CSS-Tricks article that explains the Netlify Forms/Functions + Buttondown combination.
Other than that I'm (fairly) happy so far. The user interface is a little clunky sometimes and I have to pray that my emails don't get marked as might-be-spam for everyone else like they did for me (oh please), but other than that it just works.
Conclusion
So I'll leave it at this for now. There's still plenty I could be talking about, like how exactly I built the interactive widgets in the Declarative APIs and Types blog post, but that'd be too long of an article.
All in all I'm happy how everything turned out and am even more excited for the future. While I was building this blog, Elm-pages made major improvements, I can't imagine how good future Elm-pages versions are going to be, hats off to Dillon!
Found a typo? Edit this page on GitHub.
